There may be many situations where you accidentally purchase some content from Apple Music or want a refund for your Apple Music Subscription. Most people move on, losing their hard-earned money, not knowing that Apple Music has a refund policy. Today we will show you how to get an Apple Music refund.
Also Read:
CONTENT Part 1. How to Refund Apple Music Subscription?Part 2. Get a Refund for a Song Bought from Apple MusicPart 3. How to Keep Songs from Apple Music to MP3Final Words
Part 1. How to Refund Apple Music Subscription?
Suppose you experience issues with Apple Music Subscription. You have the right to cancel the subscription. There may be various situations where you might want to cancel your subscription and get the Apple Music refund.
Many people enjoy free trial periods of Apple Music and forget to cancel the subscription upon its renewal. Which then charges at regular. No matter what is the case, you can always get a refund if it fits the Apple Music refund policy.
Apple hasn't built any internal links to claim the Apple Music refund directly, which leaves us two options. Go to the Apple Music web page or report directly from your email receipt. The first one is more handy and easy, so we will be discussing that one in the steps mentioned below.
Step 1: Open reportaproblem.apple.com and log in to your Apple ID.
Step 2: Click on the toggle upfront and click on Request a refund.
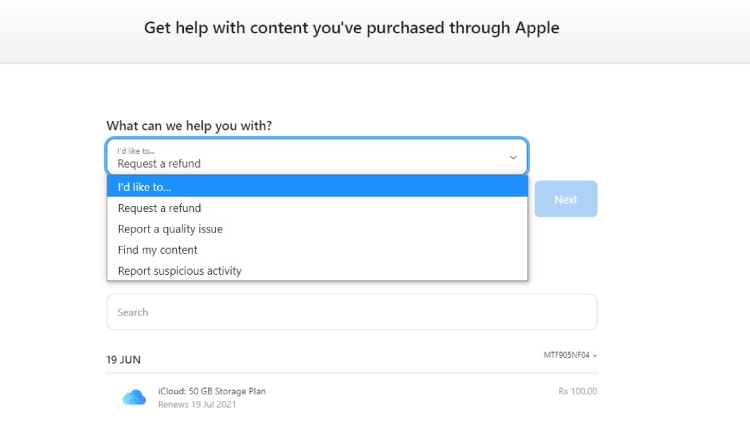
Please choose a reason why you want to cancel the subscription and get a refund for it.
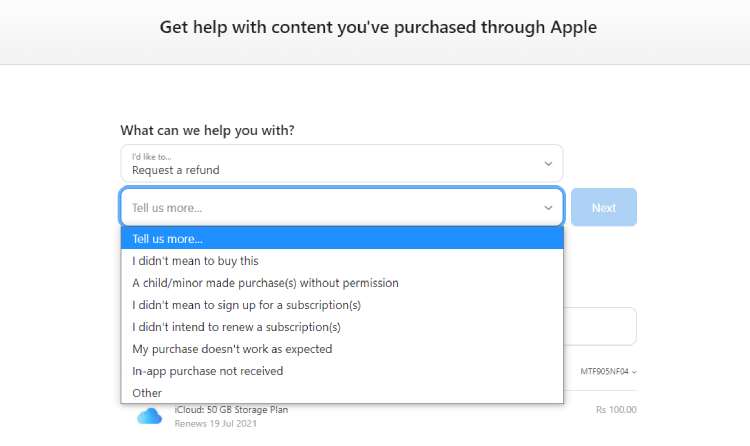
Step 3: Follow the Prompt and the on-screen instructions to submit your request to Apple Music Refund.
You can head visit Apple Music Refund page to access more information.
Part 2. Get a Refund for a Song Bought from Apple Music
Like the Apple Music Subscription, Apple Music allows you to get a refund for any digital item bought from the Apple ecosystem. If you have purchased a song or a playlist from iTunes, you can get an Apple Music refund. It would be best if you headed back to the Appel Music website, or you can directly ask for it in the e-receipt from your mail. We have discussed how to get the Apple Music refund by web page above. So here we will be discussing the other way, how to get the Apple Music refund from e-receipt?
Step 1: Open mail and open the e-receipt for your purchase. If you can't find it this way, search for a keyword search for "Your receipt from Apple."
Step2: Tap on Report a problem next to the purchase. This will redirect to the Applereportaprobelm page. Log in using your Apple ID.
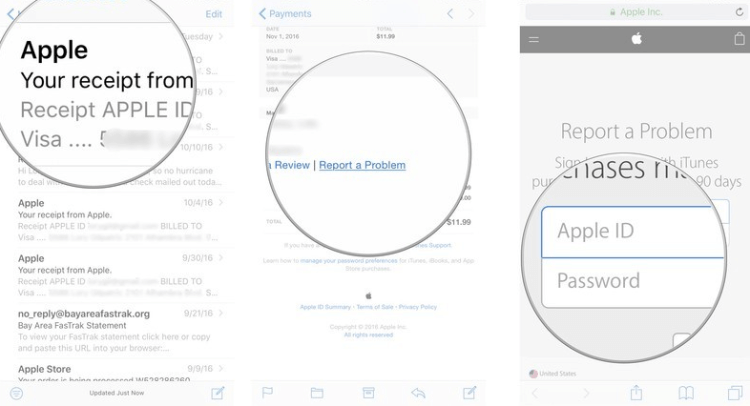
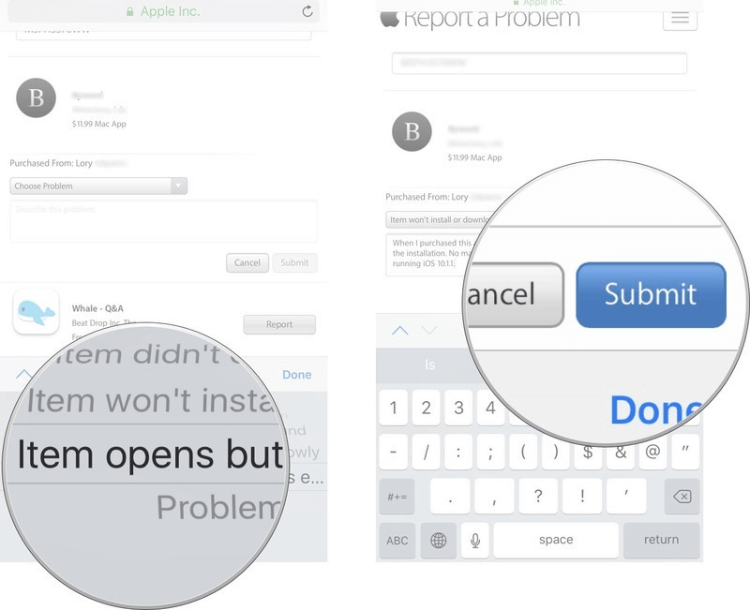
Step 3: Choose Request a refund and provide a reason for refund. Submit the problem by following the on-screen instructions.
Part 3. How to Keep Songs from Apple Music to MP3
Getting an online refund is never that easy. You might have to wait days while communicating it to Apple Music. And a couple of more days for them to refund you. So we come up with a solution where you don't have to pay Apple Music, and hence no need to refund Apple Music. You can not only get rid of paying Apple Music, but you also don't even have to pay monthly subscriptions. All of this by using one simple legit tool. Isn't it a deal?
SpotiKeep Apple Music Converter is an offline music downloader for Apple Music. It extracts music files that you want while maintaining the same quality. The offline music is now DRM( Digital Right Management) free and upgraded to MP3 format. It's a complete package and consider saving $9.99 monthly. The following are some of the features of the SpotiKeep Apple Music Converter.
- Customizable output formats including MP3, M4A, WAV, AAC, and FLAC
- Retains the original ID3 tags of songs, artists, and playlist
- No need to pay for Apple Music monthly subscription
- Lossless audio quality and batch downloads
- High conversion rates
Now it's time to move on to the practical part - how to convert Apple Music into MP3. Here is your detailed 5-step guide.
Step 1: Download the SpotiKeep Apple Music Converter by clicking on the download switches below. Install the software to complete the setup.
Step 2: Make sure your iTunes is active all the time during the process. SpotiKeep Apple Music Converter syncs with your iTunes playlist to display your Apple Music library right in the application. Once the sync is complete, you'll see your music collection from Apple Music right in the converter.
Step 3: Now that you have your whole iTunes playlist upfront. Why not start picking what to download. Check the tiny boxes right next to each song. You can select multiple pieces to download at once, thanks to the batch download feature.
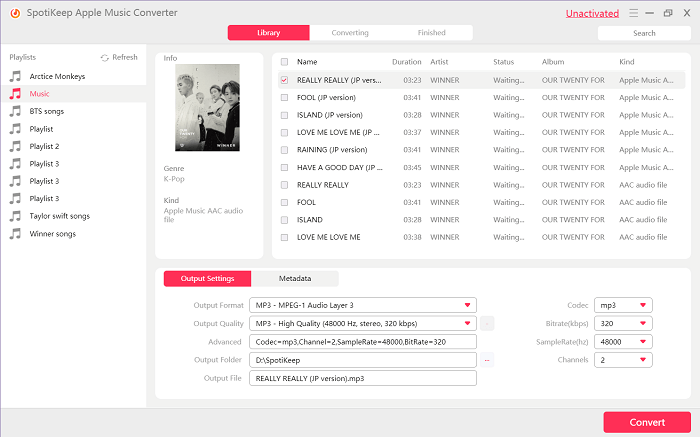
Step 4: Customize your output preferences, including output formats, audio quality, storage locations, and metadata of songs, artists, and playlists from the bottom of the screen.
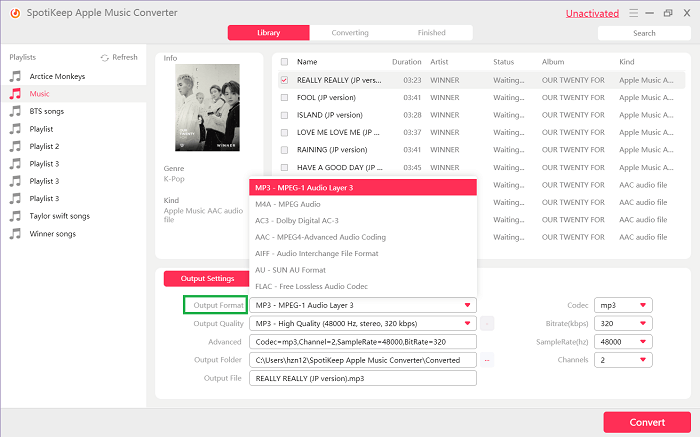
Step 5: Press the red Convert button on the bottom right corner of your screen. You can see the downloads starting right before you; each song will have its own ETA. Once the download is complete, you can browse and find the music ready to play, share or transfer to any other supported device.
Final Words
Making an accidental online purchase is horrible. But what more terrifying is people don't claim their money back. Do you know how to get your Apple Music refund? If not, we have mentioned some of the best methods to get your refund from Apple Music. You can even quit this whole dilemma of online purchases and monthly subscriptions. Try SpotiKeep Apple Music Converter's free trial for 30 days and decide for yourself.
Let us know your Apple Music refund story in the comment section below. There is a lot more help we can offer. Scroll the How-to section of our website.

Apple Music Converter
Convert and Save your favorite songs from Apple Music Permanently for Free.
Don’t miss a moment of the Music you love.

Spotify Music Converter
Download Spotify songs, albums and playlist Permanently for Free.
Don’t miss a moment of the Music you love.


Say to us
Rating: 0 / 5
Thanks for your feedback
We sincerely thanks for your comments and they are really helpful for us. If you like EasePDF, share it with your friends.